BroDynamics Interface and Advanced use
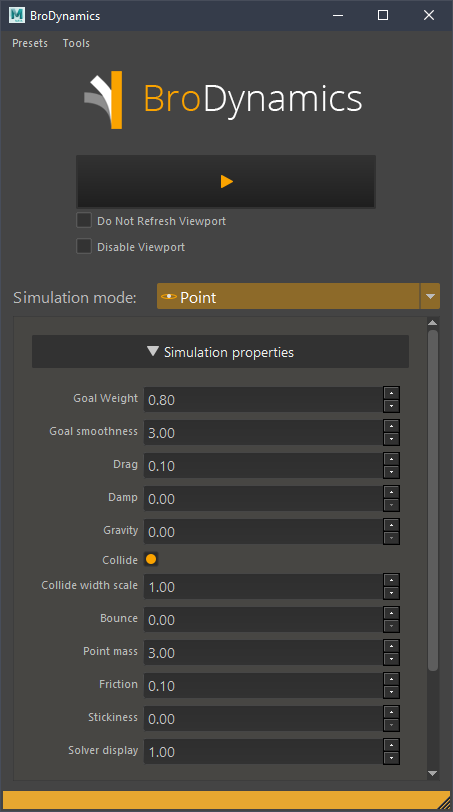
Main window

1. Simulate button
Main button! Click to start siumlation on selected objects. This is a context-sensitive button. Depending on current selected Tab below, it will use different simulation modes. To indicate that it's mode is changing, when you change the tab between Points, Chains and RBD, the color of this button also changes.
2. New Animation Layer
If checked it will automatically generate a new animation layer and all simulated keyframes will go there. Should allow to improve iteration speed a lot, no need to remove keyframes or wait for undo command to finish, just disable current simulaion layer and run simulation again. It also preserves your existing keyframes, allows to compare different simulation results or stack simulations on top of each other.
3. Do Not Refresh
Use this to disable viewport refresh during simulation. It can increase simulation speed in many cases.
4. Status Bar
The status bar. By default it shows current version of the script. Also watch it for hints, when you roll over some part of the UI.
5. Simulaiton mode
Dropdown to select current simulation mode: Point, Simple Chain, Chain or RBD.
For more information on how to use each mode refer to respective parts of Documentation
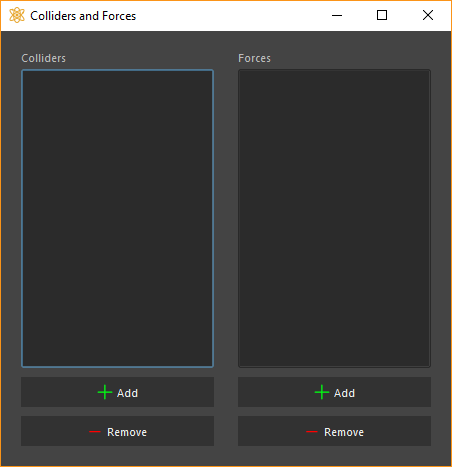
Colliders and Forces window

This is the window where you can specify collision and force objects for Chain simulation mode.
1. Object lists
In this list you can see and select objects for deletion. Objects from this list will be turned into nCloth passive colliders, and objects will collide with them during simulation. Objects colored with red means that they might not be turned into nCloth colliders correctly, and recommended to be deleted from the list. But it is not required.
Forces list contains forces which will be applied to nhair.
2. Add button
Adds selected objects to the list.
3. Remove button
Removes selected objects from the list.
Batch simulation

Batch simulation
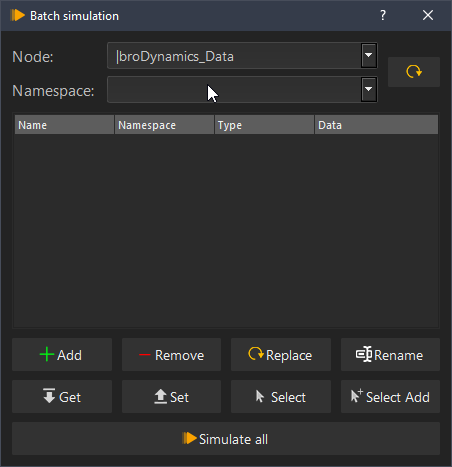
Here you can automate simulation of multiple objects and object chains. BroDynamics can remember all the settings for each chain, and store it in the scene. So next time you need to simulate all those 20 jiggly things, you can just click Simulate all, and BroDynamics will go through all of those objects and simulate them for you. Data is stored in BroDynamcis_Data node, which you can move between scenes and use as a Batch preset. When you use Batch simulation it will use saved properties, ignoring whatever is set in your current window.
Simulation list
This is the list of object sets.
Name - here you will see the name of the first object from the chain.
Data - here you can see raw JSON data, which contains: name, list of objects, simulation properties and settings.
Each item has a name, which you can replace, and which is just used for display purposes. And a JSON data, containing settings and objects for simulation. Each item will be simulated one by one, one after another.
Working with namespaces and limitations (New in 2.0.8)
Support of namespaces was added in 2.0.8. Workflow changed in 2.0.10 and further refined in 2.0.11
Here's how it works.
-
When you Add something - object names will be stored without any namespaces. Current namespace will be stored to per-item namespace dropdown.
-
When you Simulate or Select from Batch list it will use the namespace you have selected in the "Namespace" dropdown, appending it to all simulation objects.
-
Per-item namespace dropdown works as an override for the main Namespace dropdown.
Node dropdown (New in 2.0.8)
This dropdown menu allows you to select a node to work with.
Namespace dropdown (New in 2.0.10)
This dropdown allows you to select namespace to work with. This namespace can be overriden by namespace item's namespace selection.
Add button
Selected objects will be added to the list with settings from UI as a single Item.
Remove button
Selected element(s) will be removed from the list.
Replace button
Selected element will be replaced. Objects will be replaced with selected, and settings will be replaced with current UI settings.
Rename button
Rename selected item(s). Numbers will be added automatically. Note that renaming window may appear behind this window, so you might want to move it to the side. Sorry for this.
Get button
Settings from current first selected Item will be applied to the UI.
Set button
Settings in the Item(s) will be replaced with current UI settings.
Select button
Settings in the Item(s) will be replaced with current UI settings.
Select Add button
Append objects to viewport selection from selected Items.
Simulate all button
Start simulation. If something is selected in the list - only selected Items will be simulated. If nothing is selected - everything will be simulated.