Mode - Rod (Beta)
Beta
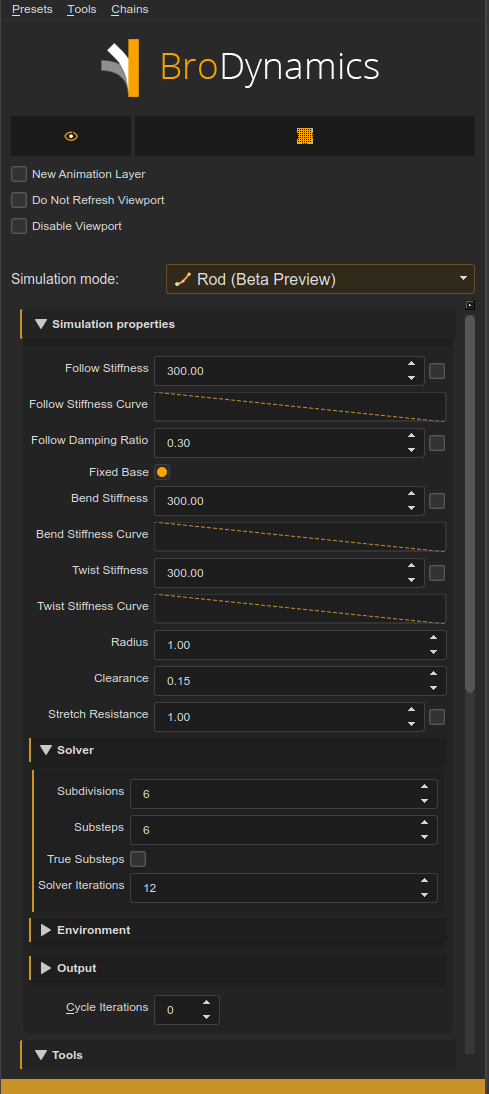
Rod mode is new and is listed as Rod (Beta Preview) in the mode dropdown. It is ready to use, but defaults and behavior may still change between releases. Feedback is very welcome.
The Rod mode simulates your controls as a continuous elastic rod, like a real antenna, cable or tail, that bends and twists along its whole length. Like Chain, it follows your existing animation as a guide and adds secondary motion around it: lag, overshoot, follow-through and settling.
It is best suited for:
- Antennae, tails, ropes and cables that need reliable collisions with meshes.
- A stiff base that falls off to a floppy, overshooting tip.
- Any FK chain that should trail and settle behind its animation.
Like Chain, it works with any selection of objects treated as an FK chain, regardless of their real hierarchy.
Selection order is important!
Select objects in order, starting from the root of the chain and progressing to the tip. Rod mode needs at least 3 objects (a base plus two links).
Preroll is recommended
As with Chain, a short preroll (1-3 seconds) before your main animation lets the simulation settle.
How it differs from Chain
Rod and Chain solve the same problem in two different ways. Both are first-class modes; pick the one that suits the shot.
Elastic rod instead of jointed links. Chain simulates a series of rigid links connected by joints with angle limits. Rod simulates a continuous strand with its own bending and twisting stiffness: it resists bending and twisting like a real material and springs back to its shape, so curves are smooth and twist travels naturally along the length.
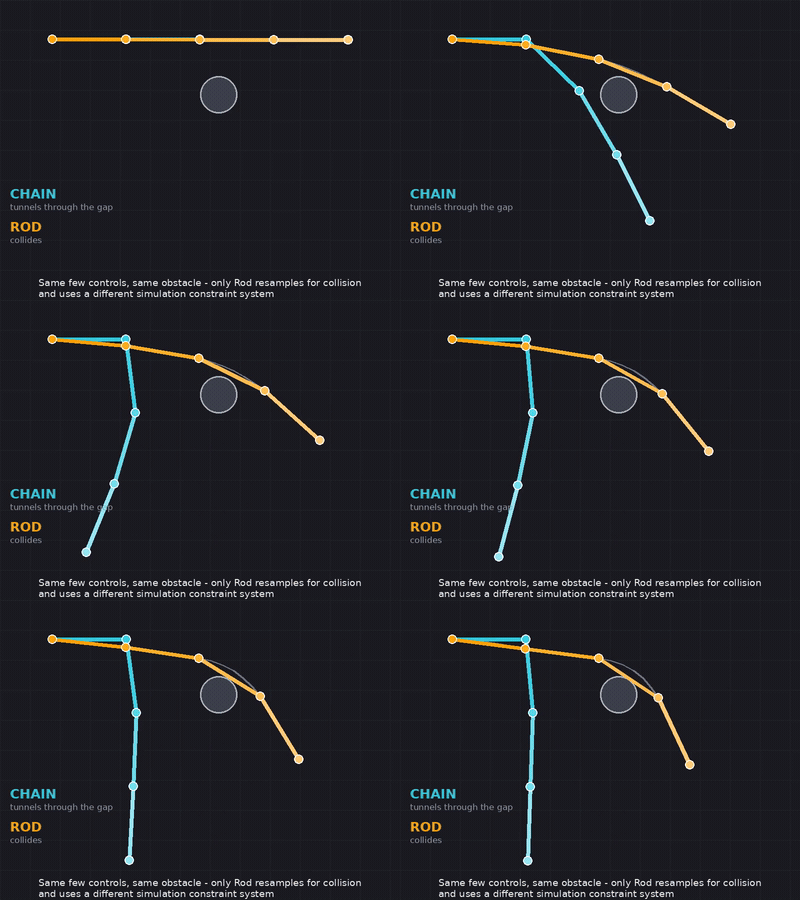
Resampling for collisions. This is Rod's biggest practical advantage. Animators usually have only a few controls on a tail or antenna, spaced far apart. If an obstacle is smaller than the spacing between two controls, a chain made of those few links can pass straight through it, because the obstacle fits in the gap between two collision capsules. Alternatively it may partially pass through an obstacle even with properly detected collision, but because it simulates multiple long capsules - it may not have enough resolution to properly bend around small obstacles.
Rod resamples your few controls into a much denser internal strand (set by Subdivisions), simulates and collides that dense strand, then transfers the result back onto your original controls. Small colliders can't slip through, and you still get clean keys on the controls you animate with.
The animation at the top of this page shows both modes with the same four controls, the same stiffness and the same small obstacle. The Chain tunnels through the gap. The Rod's dense internal strand (faint line) collides, and the controls ride over the obstacle.
When to use which:
| Chain | Rod | |
|---|---|---|
| Collisions with small or detailed colliders | Can tunnel between widely spaced controls | Reliable, thanks to resampling |
| Shape | Rigid links with swing and twist limits | Smooth, continuous bending and twisting |
| Speed | Faster | Slower; cost grows with Subdivisions |
| Extra controls | Mass, air drag, angle limits, self-collision, shape smoothing, curve filters | Fewer, simpler controls |
Examples
These clips were rendered from the Rod physics engine outside Maya. The orange end is the root and the blue end is the tip. Where shown, the faint grey line is the animated guide the rod follows, and the short green ticks show how each part of the rod is rotated.
Following an animated guide. A rod with only four controls, uneven lengths and a bent rest pose follows an animated target. The stiff base tracks closely while the floppy tip lags and overshoots.
Guide-follow with collisions. The same kind of rod, with its floppy tip draping over two obstacles while it follows its guide.
Whip. A stiff rod whose base swings from side to side. The bend travels down the length and the tip whips behind it.
Twist. The base of the rod is spun around its own axis. The twist propagates along the rod with a delay, controlled by Twist Stiffness.
Quick start
- Select the controls from root to tip (at least 3).
- Switch the mode dropdown to Rod (Beta Preview).
- Optionally add collider meshes in Tools → Objects → Colliders, and turn on Show collider radius to check the rod's thickness.
- Click Preview and press Play to see the rod live, then tune:
- Follow Stiffness for how tightly the rod follows the animation.
- Follow Damping Ratio for how much it overshoots and swings back.
- Bend Stiffness and Twist Stiffness for how springy the rod itself is.
- Click Simulate to bake.
Simulation Properties
Main controls
Follow Stiffness
How strongly the rod follows the animated guide.
Higher values pull the rod tightly onto its animation (both position and orientation). Lower values let it trail and swing more freely. Raise it for antennae that should closely track the head; lower it for loose ropes and tails.
Follow Stiffness Curve
Root-to-tip multiplier for Follow Stiffness.
Position 0 is the root and 1 is the tip; the value multiplies Follow Stiffness along the rod. The default falls from 1.0 to 0.3, giving the classic stiff base and floppy tip, so the tip lags and overshoots. Use a flat 1.0 for uniform follow, or drop the tip toward 0 for a loose, trailing end.
Follow Damping Ratio
The main overlap and inertia control.
Controls how much the rod overshoots its guide and swings back.
1.0: critically damped. The rod tracks the guide tightly with no overshoot, which can look stiff.- Below
1.0: the rod overshoots and settles, with visible secondary motion and overlap. - Above
1.0: over-damped and sluggish.
The default is 0.3. Around 0.2–0.4 suits lively tails and antennae; use values near 1.0 for tight, controlled tracking.
Fixed Base
Pin the first control to its animation.
On (the default), the base rigidly follows your root control (for example, an antenna attached to the head) and drives the rest of the rod. Off, the base is also dynamic and springs toward its animation, so the whole rod, including the root, can lag and swing. Use that for a loose rope that isn't rigidly anchored.
Bend Stiffness / Bend Stiffness Curve
How strongly the rod resists bending.
Higher values keep the rod straighter and springier; lower values let it curl and droop. Use high values for rigid antennae and low values for soft cables. The curve multiplies it from root to tip; the default falls from 1.0 to 0.15, so the tip curls more easily.
Twist Stiffness / Twist Stiffness Curve
How strongly the rod resists twisting around its own length.
Higher values stop the rod spinning about its own axis; lower values allow it to twist freely. The curve multiplies it from root to tip; the default falls from 1.0 to 0.15, so the end can twist more freely.
Radius
Collision thickness of the rod.
Sets how thick the rod is for collisions, without changing the visible mesh. Increase it so the rod doesn't penetrate colliders. It has no effect when collisions are off or nothing is touched.
Clearance
Extra distance kept between the rod and colliders.
The internal rod is dense and wraps neatly around colliders, but your controls are connected by straight segments, which can cut slightly inside a curved collider. Clearance adds a small standoff so the transferred result stays outside. 0 is the tightest fit, with some possible penetration between controls. A good starting value is about half the size of the smallest collider feature.
Show collider radius draws the full collision thickness, which is Radius plus Clearance.
Stretch Resistance
Keeps the rod from stretching.
1 (the default) keeps every segment at its rest length; 0 lets the rod stretch under fast motion. Keep this at 1 unless you want a stretchy rope: the result is usually transferred with Match Positions off, and any stretch in the internal rod would distort the pose of your controls.
Cycle Iterations
Helps to seamlessly cycle your simulation.
Works the same as in Chain: 0 is no cycling, and 1 or more runs the simulation several times to blend the end of the loop into the start. In preview, any value of 1 or more makes the preview flow across the loop.
Solver
Subdivisions
Internal links per control link.
The rod is simulated on a denser, resampled version of your controls, then transferred back. Higher values give smoother shapes and more reliable collisions (small colliders can't slip between links), at a higher cost. The default is 6.
This is the main speed control for Rod mode. If you have no colliders, or only large ones, lowering it makes the simulation noticeably faster.
Substeps
Physics steps per frame.
More substeps give better collision detection and stiffer, more accurate bending and twisting. The default is 6. Values below 4 are fast but may miss collisions; with colliders in the list, the field is outlined in red below 4.
True Substeps
Moves the Maya timeline in substep increments while baking.
As in Chain, the animated guide is evaluated at its real in-between poses for each substep. Use it when a very fast animation needs accurate mid-frame motion. Keys are written at every substep time and then cleaned up by the Simplify Curve Filter. Bake only; preview is unaffected. Requires Substeps greater than 1.
Solver Iterations
Constraint solve passes per substep.
Higher values make bending, twisting and contacts stiffer and cleaner, but cost more time. Increase if the rod feels rubbery or penetrations are not resolving.
Environment
Gravity
Downward gravity strength.
Pulls the rod along negative Y. 0 (the default) means the rod is driven only by its animation. Small values give a subtle droop; larger values make heavy, sagging cables.
Friction
How sticky contacts are when the rod touches colliders.
Higher values grip surfaces; lower values slide freely.
Restitution (Bounciness)
Bounciness of collisions.
0 means no bounce, 1 is perfectly elastic. Keep near 0 for tails and ropes.
Linear Damping / Rotation Damping
Extra drag on the rod's motion and rotation.
Both apply on top of Follow Damping Ratio and default to 0. Use Follow Damping Ratio to control overlap; raise these only if the rod feels too floaty or keeps twisting and swinging for too long.
Enable Collisions
Collide the rod with the collider meshes.
When off, the rod ignores all colliders, which is faster. Add meshes to the Colliders list for this to have an effect.
Continuous Collision (CCD)
Catches fast collisions.
Prevents thin or fast-moving parts of the rod from passing through colliders between steps. Slightly slower.
Output
Match Positions
Write simulated positions back to the controls (TX/TY/TZ).
Leave off for FK chains where only rotation should be driven.
Match Rotations
Write simulated rotations back to the controls (RX/RY/RZ).
Usually on, since rotation drives most of the visible motion.
Euler Filter
Runs Maya's Euler Filter on baked rotation curves.
Removes 360-degree flips and keeps rotations continuous.
Simplify Curve Filter
Runs Maya's Simplify Curve Filter on baked curves.
Reduces keyframe density and small jitter, giving cleaner, easier-to-edit animation.
Realtime Preview
Rod mode supports the same Preview button as Chain. See Chain → Realtime Preview for how it works.
In Rod mode, most properties update live while the preview plays. Changing Radius, Clearance, Subdivisions, Fixed Base, Match Positions, Match Rotations or the collider list triggers a short rebuild.
Tools
Rod mode uses the same Colliders list, collider types (Trimesh, Voxbox, Convex Hull) and Show collider radius toggle as Chain mode. See Chain → Tools.
In Rod mode, Show collider radius draws the full collision thickness (Radius plus Clearance).
Rod mode also supports Multi-Chain Simulation: mark several rods with the Chains menu and simulate them together, with collisions between them.